Making of 'Why PhD'
Each cartoon is drawn in several layers. Each layer builds on top of the previous. The result -- if achieved -- is all simplicity and elegance. Each subsequent layer hides away the details of its predecessor.
In a sense, those who are interested in understanding the process that brings out a cartoon in all its glory stand to lose when the earlier layers sacrifice their life to hold up their successor layers. For the artistic minded, the beauty of a cartoon is not just in the final output, but also in the process that brings it out.
I had always wanted to record my own process and progress during the making my cartoons. But something had always stopped me. The unwillingness to get distracted by the need to document was of course there. But more importantly, it was an unknown fear. Each cartoon is actually a shot in the dark -- as likely to miss its mark as to hit it. I would love to record (and show off) my success. But if it all ends in mud, I would rather want to forget it!
This time, I tried, for the first time in my life, to record at some level of granularity, the process of the making of a cartoon. Throughout its making, I clicked some pictures and recorded the approximate time taken in each stage.
Follows a brief step-by-step account of the making of 'Why PhD?' cartoon that I drew recently.
Concept, design
For years, I had read artists making a statement that the conceptualisation phase of the drawing is hardest part while the rest just follows. I wouldn't believe them and would even think of them as showing off.
Now, I don't completely disbelieve them. Having learned through years of agony how much work it is to bring one drawing into existence, I have fallen in line -- very very unwillingly -- with others who think that it's better to put in as much effort in the beginning as possible than struggling later and settling with a mediocre or failed piece because of wrong decisions made earlier.
The inspiration may happen in a flash. Detecting the humour in that may also not be too hard. However, everything depends on your choice of how you decide to present that story. On the one hand, it involves thoughts about how to draw it so that the story goes across with as much punch as possible. On the other, it involves agonising cost-benefit analysis: how hard am I ready to work to deliver the joke. One panel? multi-panel? Single page? Multi-page? Coloured? Black-and-white? A joke delivered through a multi-panel comic may tickle the right funny bone, but may involve humongous effort. A single panel may be easy to draw, but may get too crowded with content to make a pleasant read. There are several ways the story can be told. Each has its own level of punch. Each involves a different level of effort. Each involves its own level of risk of failure.
Once you are settled with the level of detail and high-level flow, you have decide the perspective (camera angle), the detail in which you would like to draw the scene and the overall composition.
This stages typically goes on for days and weeks, mostly in the form of gnawing worry keeping you from being able to concentrate in other things or sleep well. I have come to the opinion that it's OK to stay stuck in this stage until you see a drawing floating right in front of your mind's eye. Of course, if you are in for a casual scribbling, there's no need to bother.
Pencil

Tools
 |
| 2B, 4B, 5B Pencils |
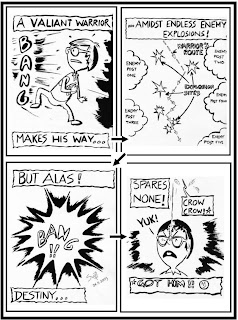
Time taken: 9.30 am to 12.30 pm (3 hours)
Shown above is the final output of the penciling stage -- the first stage with a concrete output. This is also the longest of such stages and the most challenging one. It's when all your abstract ideas have to be beamed down on the surface of the page. All experimentation has to be done here. The fate of the cartoon is cast on stone at the end of this stage. If you have crossed this stage safely, the cartoon is unlikely to fail barring when rare mishaps happen, e.g. spilling of paint or something.
Different artists have different stands regarding when to end this stage and proceed to the inking stage. Some go all out and pencil out the finest details before taking up inking. Others leave some of the details open for the inking stage. In my case, I may be classified in the first category. I simply avoid leaving any decision to the time when I am working with ink/paint.
Inking - Stage 1

Time taken: 2 pm to 3 pm (1 hour)
Tools
 |
| Comic Dip Pens |
 |
| Indian Ink |
Inking - Stage 2

Time taken: 3 pm to 3.30 pm (0.5 hours)
Tools
 |
| Brushes (Sizes not noted) |
 |
| Comic Dip Pens |
In this stage, we try to puff some life into the inked lines. The important lines have to be broadened. Lines have to enlivened (using thickness variation). The darkest regions of the drawing may be identified now and may be committed to the black.
This stage is a delicate one. It needs careful selection of inking tool (pen or brush) at all points. Line thickness has to be judiciously decided on a case-to-case basis and must be varied within a single stroke. I guess, in art school, they would teach you some principles and tricks. I don't know any and pretty much go by my instinct. Of course, I try to leave some hints for this from the penciling stage itself.
Pencil Shading

Time taken: 3.30 pm to 4 pm (0.5 hours)
Tools
Whether we wish to go colour or black-and-white, deciding the major tones in the cartoon is an important step and has a very significant impact on the final appearance of the cartoon. Done well, it brings balance, tightness, flow and focus to drawing. Messed up, it dissolves the clarity of the lines, shifting the focus away from the important parts of the drawing. This makes it more effortful to interpret the picture directly impacting the interest it evokes.
 |
| Pencils |
This stage being so important, I again go back to the pencils. I experiment with various tones until I am satisfied with the tonality of the drawing. Once there, I take a photo and erase off the pencil shades (this took all of 10 minutes).
Final Cartoon

Time taken: 4.15 pm to 5.30 pm (approximately 1 hour)
Tools
 |
| Indian Ink |
 |
| Brushes |
 |
| Comic Dip Pens |
The final step on paper is to recreate the shading with paint or ink. I use the same Indian ink, this time diluted with water for creating various shades of grey. This stage is fun and stress-free as we already have a reference (photograph of the pencil-shading).

Once the hard copy is ready, it's time to start working on the soft copy. So, the first step is to take a good photograph. I use my mobile phone camera. A couple of precautions in order:
Time taken: 5.30 pm to 7 pm (approximately 1.5 hour)
This time, I went for translating the cartoon into various Indian languages. Again, this took humongous effort finding a willing translator, and following up. Sometime, I would run into a well-meaning but finicky translator who would toil over the translator. Somehow, as the primary creator and requestor, I am not supposed to lose interest. So, this led to a lot of time getting consumed.
I have decided to go easy on translations next time on. 😅
Software Post-Processing

Once the hard copy is ready, it's time to start working on the soft copy. So, the first step is to take a good photograph. I use my mobile phone camera. A couple of precautions in order:
- Enough resolution
- Uniform illumination
- No parallax
- Cropping, rotating etc.
- Adjusting brightness and contrast
- Removing stains, shadows etc.
- Putting border, heading etc.
- Final addition of the lettering
Time taken: 5.30 pm to 7 pm (approximately 1.5 hour)
Social Network Sharing
Once I am satisfied with the result, it's time to go public. Putting it up on social network may appear trivial, but takes up a surprisingly high share of the overall effort. Following a rough list of stuff I do as a part of this:
- Creating the primary Facebook post on the Mr. Laapataa page
- Sharing the post on my personal timeline and other groups
- Sharing the cartoon with friends and family on Facebook
- Instagram post
- Laapataa blog post
Translation
 |
| Hindi (Translated by: Sujit Kumar Chakrabarti) |
 |
| Bangla (Translated by: Shatabdi Mukherjee) |
 |
| Marathi (Translated by: Shailesh Sahasrabhojanee) |
 |
| Tamil (Translated by: Dinesh Babu Jayagopi) |
 |
| Telugu (Translated by: Jyothirmayi Krishna) |
 |
| Kannada (Translated by: Deepak G. C.) |
This time, I went for translating the cartoon into various Indian languages. Again, this took humongous effort finding a willing translator, and following up. Sometime, I would run into a well-meaning but finicky translator who would toil over the translator. Somehow, as the primary creator and requestor, I am not supposed to lose interest. So, this led to a lot of time getting consumed.
I have decided to go easy on translations next time on. 😅
Posing with My Prize

Again the first time for me. I did it partly to create a sense of the dimensions of the picture. Its soft avatar seen on the phone gives no sense of its scale. One objective of posing with it to record its size too. 😃


Comments